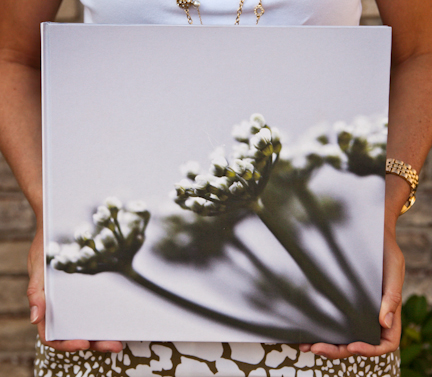
That’s right! Now you can create a Bonte Photo Book and send it to family and friends. Better yet, they can either order the photo book directly OR they can make changes and edit it, add more photos, change some text and then order it.

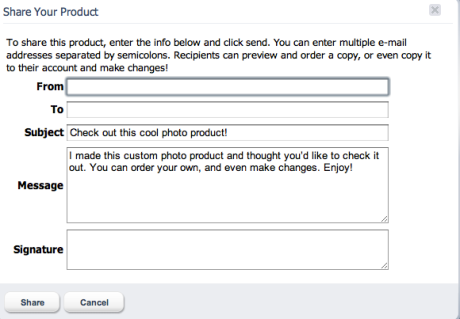
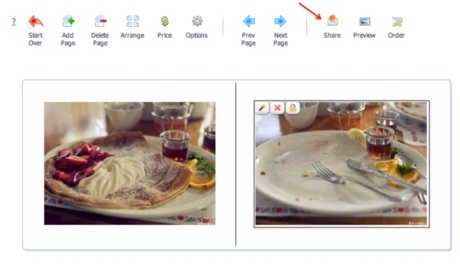
Here is the new screen you’ll see when you’re creating a Bonte Book. Notice all of the icons are at the top now and they are all labeled, so you know exactly what they are (great, huh!) The share feature is the third from the right – a little mail icon (made extra noticeable by the lovely arrow icon I added!) Once you want to share your book (beginning, middle or when it’s completely done – it’s up to you!) just click on the share icon and you’ll see this:

Just like an email! Simple and easy to use – you can change the subject and body of the email and even send it to multiple people, just separate each email with a semicolon and send away!

Here are some ideas on how to use the share feature:

  • Family Reunions – Start a book and share it with family members so they can add photos, keep sharing until everyone has edited the book and then let everyone order one on their own. Makes shipping much easier.
  • Baby Books – Create a photo book for each month of your baby’s life. Share it with both sets of grandparents quickly and easily. They will LOVE you for it!
  • Start a “Photo Pal” project – Find a friend (perhaps far away) and pick a theme like 11:00am or green and take a photo for that theme everyday. You take a photo, s/he takes a photo. Create a Bonte photo book and upload your photo, share the book,  and each day you see the side-by-side spread. At the end of the month you’ll have a complete book.

Any other ideas on how you want to share your Bonte photo books? Let us know!

Polaroids. They were here and then they were almost gone, now they seem to be back. (yay!)

But even if you don’t have a polaroid camera or the hard-to-find film, you can create entire photo books with that instant photo look. Just select the Polaroid-like theme on Bonté Books.

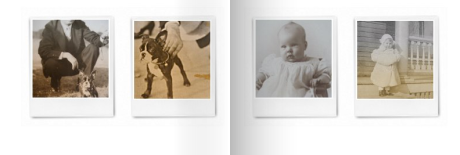
This theme is clean and simple. A basic white background with a few different photo layouts – one photo (shown above) or 2-4 a page depending on the size of the book. The larger books can fit four photos, the smaller ones fit two photos (see below.)

This theme is great with any type of photos but I decided to use it with old family photos. I have a few albums that were given to me by my grandma filled with family photos, most over 70 years old. The photos were very fragile and I would hate to see anything happen to them. I decided to make a photo book as a way to permanently “save” the photos forever. It’s a great way to preserve family history and gives everyone in the family an opportunity to have a book of their own.

I started by scanning the photos, uploaded them into Flickr, and then selected the Flickr tab on the Bonté Books photo uploader. Once the account was linked, I selected the set that contained the old photos and ta-da – there they were. Simple and easy! (you can also upload them directly into Bonté and bypass Flickr)

Then I just started designing my Bonté photo book by changing the layouts and adding photos. This is a 5 x7 photo book so the layout below shows two photos per page – four total across a two page spread. You can also add text below the images.

What’s great about the Bonté Books’ photo book software is that it saves your work as you go – no need to worry that your book might be lost. You can start a book tonight and if you can’t finish it, just come back to the site tomorrow and it will be there – just click on the existing projects button.

Look, in this next layout I did add text. It’s helpful for this type of book because then everyone knows who is in each photo, and you could even add the year if you’d like.

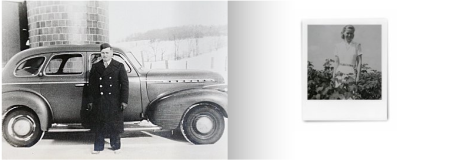
Plus Bonté has a layout with a full page photo on one page and a polaroid photo on the opposite page. It adds a nice variety,

As you can see the polaroid theme is easy to use and creates a very clean design. Try creating a Bonté photo book with it today!

We want to hear from you!! What are your thoughts on this theme? What other themes would you like to see – leave a comment and let us know!!

There are probably hundreds, no thousands (or more!) of unique ideas for Bonte photo books. Of course there are the standards: vacations books, weddings books, kids books, pet books which are all great (and we love getting orders for them!) but ever consider doing something a little different? Sometimes it takes a photo project to really get you motivated to start taking more photos (everyday!) and actually make a photo book (it’s not hard!) With that in mind, we gathered a few interesting photo projects below. It’s amazing how they capture everyday life and make it more fun.

Just for kids!

Watch your kids grow! Use a chair and take a photo every month to see how big they are getting! (This could also work for pets!) This artsy mom even added the corresponding month number to each outfit! Such a cute idea. LOVE it!

(Copyright Natzfirefly via Flickr)

Strangers!

Heard of the 100 Strangers Project? www.100strangers.com This project will get you out of your comfort zone and talking to people. The goal is to approach people and take their photo. There are many variations and you can really make it unique by asking them a fun question, making them make a funny face,etc. For an example check out this set on Flickr – some very interesting people!

(Copyright Teppo via Flickr)

Pencil vs. Camera!

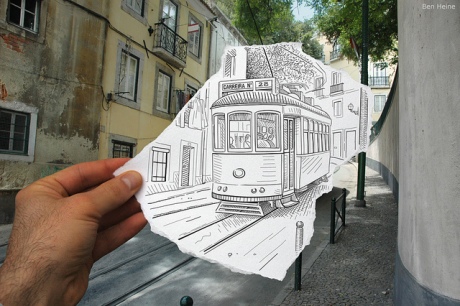
If you can draw, this one might be fun for you to try. Ben Heine uses his sketches in photos to bring them to life. Check out more here!

(Copyright Ben Heine via Flickr)

Project 52:

This project is more manageable than it’s older brother Project 365. Instead of taking a photo everyday, you take a photo for every week of the year. By the end you have a nice history of your life in 52 photos that would become an impressive photo book. (ps. This type of book would be perfect using Bonte’s snapshot/polaroid theme!) The best part is you can pick a fun topic and base your photos around that, like the example below – 52 weeks for dogs!

(Copyright bernerful-life's via Flickr)

Which photo project do you think you’ll try next? Are you working on any fun photo project of your own? Share them in the comments! One lucky comment will receive free shipping on their next order!

As a gift, I recently took photos of my friend’s now 3 month old daughter. A very cute, little doll of a baby. Her sweet face needed to be captured and I knew I wanted to make her parents a Bonté photo book with all of the photos I had taken.

Here’s how I created that photo book, step by step.

1.Get started: After going to bontebooks.com I clicked on the Get Started button which took me to this page.

2. Upload images – I started by clicking on Manage Your Photos and then began uploading all of the images that I took of little Emma. As you can see, you could also use your Facebook, Flickr or Photobucket photos as well.

3. Create a Photo book: After I uploaded the images, I was taken back to the Get Started page. Now I clicked on the Create a New Photo Book button.

4. Choose a book size/type: A total of 6 different photo book sizes are available. I choose the 8×8 size. I love the look of the square photo book and it’s just the right size for this project.

Then I was given the choice between an image cover or a cloth cover. It was a hard decision but I decided on the image cover. I wanted a photo of baby Emma as the cover so that was the first thing her parents see.

5. Choose a Theme: There are many themes to choose from so now is the time to decide. But don’t stress out too much. You can change the theme throughout your book making process. Literally every page of your Bonté photo book could be a different theme. (I’m not sure exactly why you’d want to do that but you could and that’s all that matters.) Go theme crazy – you’re given complete control. I decided to go with a simple look to let the photos of Emma be the main focus. I choose the Contemporary theme in clean white. 

6. Layout the cover – I made the cover full bleed by clicking on the “magic wand” icon on the photo. As you’ll see below the lock box is checked. Click the box so that it isn’t checked to unlock the photo. Then I moved and expanded the photo until the cover was ah, completely covered. ; )  Then I added a title to the cover and started designing the rest of the book.
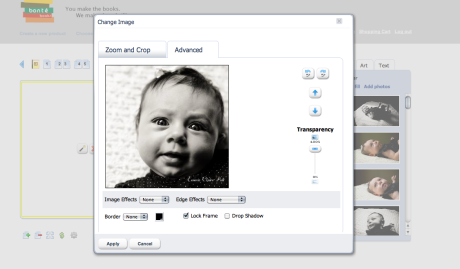
Here’s the cover with the photo and a small title.

7. Design the Pages – Here’s an example of a spread I did using the Pro Photo theme. I just clicked on themes and selected Pro Photo and found this page layout. I liked that it used multiple shots on one page because I wanted to show all of her cute baby expressions.
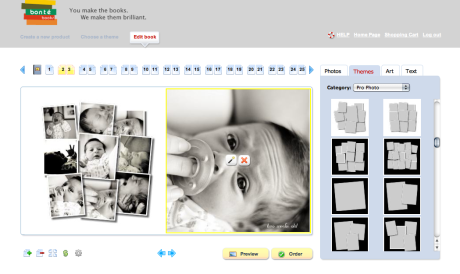
8. Icons: Once you’re done laying out the pages, it’s important to click on the icons located below the pages.

  • The first icon (page with a + sign) lets you add a page – either to the left or the right.
  • The second icon (page with a – sign) lets you delete a page – again either the left or the right.
  • The third icon (4 pages) shows the layout of your photo book and let’s you rearrange the pages.
  • The fourth icon ($) shows you how much your photo book will cost.
  • The fifth icon (the gear icon) is very important. This is where you can add spine lettering. Click on it and you’ll see this:

9. Preview your book: Once your book is completely laid out you can click on the preview button to see your book page by page. I used this to make sure everything was exactly how I wanted it ( i.e. spelled correctly and all of the photos were in the correct order.) If you’ve selected a linen cover this is where you can select the linen color you would like and preview the selection. Just go to the cover and you’ll see a drop down of the 14 different colors to choose from.

10: Order your book: Once I was happy with the layout and made sure everything was spelled correctly, I ordered my book! Just clicked on the order button and was taken into the shopping cart where I reviewed the cost. You can also add a coupon code here if you have one.  Then click through and you’ll be asked your address/credit card information, typical stuff.

Then…. Ta Da! You’re done. Once your order is sent, Bonté takes between 3-5 production days to complete your book. Then your beautifully bound photo book is shipped, it arrives and you see how Bonté Books provides a higher quality photo book.

Hope this quick overview helped. If you have any questions with any step of the process, let us know in the comments below!

Now you can create your own photo book –  get started here! As an added incentive, from today, August 11th through Sunday, August 15th ONLY use the coupon code BonteBlog40 for 40% off your order!
This is our 5×5 sized photo book – “Petite” as we call it. It’s cute and very portable. Best use? Create one to put in your purse (or bag or car for guys) so you can show off your latest (kid, pet, travel) photos.

5x5 Photo Book

(fabulous bag photo courtesy of Evelda’s Neverland)

Our next featured size is much larger. It’s the 11.25 x 8.75. Best use? A bookcase! Can you image an entire bookcase filled with photo books of your life? Kind of a fun idea, right? Plus, with spine lettering available you can easily find whichever book you’re looking for! (awesome bookcase (and cat!) photo courtesy of boudist.com)

Next up is our largest photo book the Grand 12×12. Best use? Your coffee table! This book size is perfect for wedding photos, family photos or your impressive travel photos. And like all Bonté Books it comes in either linen or image cover options.

(photo courtesy of Apartment Therapy)

So now’s the time to get started on your next Bonté photo book!

What’s your favorite book size? How are you going to use it? We’ll give one lucky person who comments FREE shipping off their next order!

The winner of our free photo book give-away was selected through random number generator and it goes to comment #1 – from Jesse Freidin of jessefreidin.com!! We might have checked out his site and his work is AMAZING! Jesse is a fine art dog photographer and we can’t wait to see the incredible Bonté photo book that he creates.

Congratulations Jesse!

I’ve always been mildly obsessed with journals.

There’s just something about the clean pages, the possibility of words, thoughts, emotions. Journals, like photos, are a way to capture everyday life. From the beautiful to the painful and every-little-silly-detail in between. And best of all, journals are always there, just pick it up and go. Write, draw, paint, or scribble – it’s completely up to you.

Now, with Bonté Books you can create a photo book journal. That’s right, a custom theme where you can add lined pages (or graph paper!) along with your own photos.

Photos + Journal. My two favorite things together.

The possibilities are nearly endless. The best way to tackle it –  jump in and get creative.

I made my journal 12×12 because I’ve never had a journal that large and it seemed more impressive to me.

And, as you can see, impressive it is.

When you select the journal theme you have the option to add text to the pages as well. I used this feature to add quotes and phrases (see the first photo!) to select pages. You can also add full page images or a smaller image in the middle of the journal page.

And like all photo books from Bonté Books, you can expect it to be professionally bound to last. Unlike other photo books that fall apart, Bonté Books are made to last a long, long time.

Here are some creative ideas for the journal theme:

  • Create a journal for your kids! Add photos of them and your family and friends and encourage them to write (or draw) about their life.
  • Journals make the perfect baby shower gift! The perfect way for a soon-to-be mom to write down her feelings before and after the baby is born.
  • A great big to-do list. It just makes it seem a little less daunting (and slightly more fun) when you have something nice to write your to-do list on.

Do you have any ideas for creative journaling? Or do you have an idea for a custom theme you’d like to see? Let us know!! We’ll select one comment to receive a FREE photo book!

Manage your photos with Flickr & Facebook

Things to think about . . .

Did you know that Bonté Books is supported by Flickr and Facebook? Our software makes it easy for you to use photos from your Flickr account and Facebook page!

When you are on www.bontebooks.com, click on “Get Started” which is found at the top right side of the web site. Then, click on the “Manage Your Photos” banner found at the left side of your screen. Next, create an account or log in or an already existing account.  (Don’t worry, our site respects your privacy).

There are five tabs : My Photos, Stock Photos, Facebook, Flickr, and Photobucket.

The first tab, “My Photos,” is where your personal photos that you have uploaded from your computer, a CD, or a USB drive are stored. (Our software saves your folders in alphabetical order).

“Facebook,”  “Flickr,” and “Photobucket” tabs are next. If you have accounts on one or all of these web sites, you will follow the same instructions to use these photos.

If you click on one of these tabs your computer will bring up a new window which will ask you to log into your Facebook/Flickr/Photobucket  account. After you do so, our software will bring up all of your photos and albums that you have on your Facebook/Flickr/Photobucket page.

You can then click on “Home Page” found at the top right side of your screen. Then you may “Create a New Photo Book” or “Work on Existing Project”. After you chose a hard cover book theme, click on “Change source” found in the “Photos” tab on the right of the page. Then click on the “Facebook,” “Flickr,” or “Photobucket” tab,  then click on which folder or photos you currently want to use (NOTE: you can switch folders throughout your book), then click “OK”.

Now you may go ahead and hand select which photos you want where in your photo book or (if the photos are in order of which you like) click the auto fill button. REMEMBER : Before you auto fill, first click on the “themes” tab so you can chose how you want your pictures laid out on the pages. There are different choices! If you want to change the layout, you must [click and drag]. – the same as you would with your pictures.

Have fun designing your beautiful hard cover photo book!

And remember… You make the books. We make them brilliant.

Spine Lettering

Spine Lettering makes finding your books easy.

We are a little different . . . we like our books to have lettering on the spine so we can find them easily when shelved.  That’s why we offer spine lettering on all of our photo book products.  You can create your photo books with one of our durable, attractive cloth covering materials or design your own cover by inserting lettering on the spine (as well as front and/or back covers if you wish) with our image cover option.  The best part of adding spine lettering to your photo books is that it doesn’t cost you anything additional.

When adding spine lettering to a cloth cover, there will be a field on the Payment Info screen during checkout.  You can enter up to 30 characters and it will be stamped on your photo book in all UPPER CASE letters.

You can click here to check out more “Helpful Hints”.  We are here to provide you with high quality photo books that will last you and your family for generations.  You are more than welcome to contact us at customerservice@bontebooks.com.

Bonté Books is underway.  We are here to provide you with beautiful, strong, and dynamic photo books of your travels, your wedding, your kid’s adventures, your life.  Check out our website at bontebooks.com. We also offer a Self-Publish side that will help you create the book you’ve always wanted. We hope you enjoy the site.

Celebrate !!!

A beautiful Bonté cake to celebrate the launch of Bonté Books.